MOVE WELL STUDIO


4 Comments

Training the forefoot – a video from the beach

If you are training with me, or have ever even talked to me about my shoes, or lack of, you know I am very foot-centric. ”Why the foot?”, you may ask…if it’s your knee, hip or shoulder bugging you.

You can’t ignore the foot for long, that would be very much like ignoring the tires on your car. If you ever got a flat, you probably pulled off on the side of the road and did what you could to save yourself and your vehicle.

We do the same with training your feet – we take your shoes off, see how stiff the foot has become from wearing shoes and misuse and take the steps necessary to make it a healthy and functioning piece of equipment so you can hit the road. Oftentimes, your other issues, like that bum knee and nagging low back pain, go away by themselves.

One way we misuse the feet is by pointing them out. In this video Katy Bowman, founder of the Restorative Exercise Institute and my dear mentor, explains what that does to your knees. Check it out and see how you can get your feet straight!

Now, once you have your knees straight, oftentimes placing the femur  and the foot where they belong lifts the inside of the foot off the ground. The forces in your hip and the foot don’t exactly match because you have been using your foot as one whole piece stuffed in a stiff shoe for a majority of your life.

To the rescue comes forefoot eversion. This is a fancy way to say that the front part of the foot, where the ball of the foot is, moves in (or toward the ground) relative to the back side of the foot (the one that has the heel). A lot of the muscles we use for that action are weak or asymmetrically developed and that can lead to a host of issues.

Last week while playing on the beach in Ventura with some of my colleagues, we experimented with a fun way to use seaweed and the sand to train the foot. Check it out and let me know what you think!


3 Comments

De-stress your holidays in advance

Isn’t it amazing that what’s supposed to make us happiest also makes us so tense? Decorating, choosing the perfect gifts, rushing to find a parking space, crowding at the movie theater? Even writing about it is making my inner self get all tangled up.

Sometimes we feel hard to express tension and frustration and we are physically unable to relax. At those times, I find that positioning the body in an essential psoas release is a great place to start.

Why the psoas and what is it? One of the most amazing illustrations I have seen of it is HERE. Even if you choose not to look at it, know it’s a pair of long loin shaped muscles that run from your lumbar spine forward and end up attaching to the inner thigh area. Those ginormous muscles have an amazing ability to link the upper and lower part of the body for movement, but are also powerful communicators of stress and tension in the body, and often alert us of stress and frustration, through back pain, pelvic pain or digestive issues.

The goal of this relaxation exercise is to ease the tension in your deep core and lumbar area. To set you for it, go ahead and fold a large blanket until you have it square to the thickness of a firm pillow. Place it on the ground and grab a small pillow.

Before you go into the release lay on your back and assess how tense or relaxed your body is. Check your chin position, the shape and contact of your shoulder blades on the floor, how far your spine is from the floor in its different segments, are the backs of your thighs relaxed on the floor or are they lifted off the floor, where is your pelvis and generally how relaxed on the floor or ”lifted off” the floor you feel.

To set up for the release place your shoulder blades on the folded blanket (or yoga bolster). Place the small pillow or yoga brick under your head so that your chin can drop down and relax. Place your arms at your sides palms up. From here you can assess the elevation of your ribcage – you can touch your ribs and see how far they are sticking up, out or to the side. Ideally the ridges of your ribs should be flush with the flesh of your abdominals and not visible at all.  Using your breath, gently breathe in and breathe out, allowing the chest to relax towards the ground and the low back to ease into an imaginable hammock.

DSC_1811

You can lay and breathe in this position for as long as you like, preferably for at least 10 minutes. Most people who experience back tension and digestive distress want to spend even longer. I personally have had many days when I relaxed in this position for 30 to 45 minutes at a time and got up very relaxed and refreshed.

The great thing about getting unnecessary tension out of your neck and low back area is that the new state of your muscles communicates back to your mind that there is a new calmer version of you emerging from the relaxation. Your thoughts start to flow better, creative block gets broken, numerous aches and pains subside and go away.

Once done with your release, lay back flat on the floor to assess what changes have occurred in your system – are your shoulders closer to the floor, is your ribcage more relaxed, can you feel that space under your low back decreased?

December can be a crazy month, but there is something you can do – participate in making it less crazy by taking your own tension out of your way and going about your day with peace and flow.

Move well and happy Holidays!

Galina


2 Comments

A new way to use your chair

Most people sit on chairs, and never think that they can be a useful tool to get healthy.

A lof of health complaints can be blamed on a chair – anything from hip and low back pain, to problems with digestion and breathing, concentration and productivity.

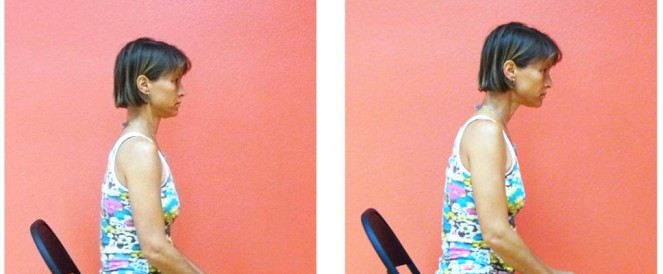
The 90/90 position that chairs, couches and cars put us in cause chronic tension and shortening in all anatomical lines of the body, but the back line takes the biggest beating – from your plantar fascia, through the calves, hamstrings, low back – to the upper back, neck and temples, your body tightens, oxygen delivery worsens, tissues suffer and stiffen and when you get up from your chair or go and try to work out, your low back, hips, knees and feet may start to scream.

To make it worse, many people wear shoes that cause additional stiffening of the back line – any positive heel, a few mm to a few inches, can make matters worse. If you are into sports, sitting is fatal to performance, as it worsens your ability to store elastic energy, making jumping, and even sprinting and running, poor. Any bending forward movements that require hinging at the hip, are affected and movement patterns become dysfunctional and painful, leading to injury and long breaks from training.

How about other complaints like constipation, indigestion, pelvic pain, incontinence, breathing difficulties or inability to concentrate? Sitting may be involved here as well.

How about the ladies, who want to have a nice round shape to their glutes? Impossible if you are sitting on them all day. In my Neurokinetic Therapy ™ work, I often find the glutes unable to perform, and the calves extremely stiff and unable to yield to a stretch.

To undo some of the damage of sitting, I am offering you two super simple versions of the ”double calf stretch”. You can do it anywhere and make your chair a weapon of health instead of a weapon of destruction.

Double calf stretch for beginners

Image

Stand in front of a chair. Place your feet at hip width. Point your feet straight forward with the outside edges of your feet straight. That means that the outside of your foot will be parallel to the edge of your yoga mat. Straighten your knees. Start to slowly bend forward at the hips, making sure your low back stays neutral. Only go as far as you can move your tailbone up without flexing your low back. Support your hands on the chair. You will feel a stretch in your calves, the backs of your knees, your hamstrings or your glutes – everyone feels a different stretch. Hold for a minute and repeat 2-3 times.

For an extra challenge: check with the tension in your quads by relaxing your knee caps.  You should be able to drop them loose during the stretch. Next, externally rotate your femurs so that the backs of your knees are pointing straight back. This may lift your arches.  How about that?

Double calf stretch for the advanced user

Image

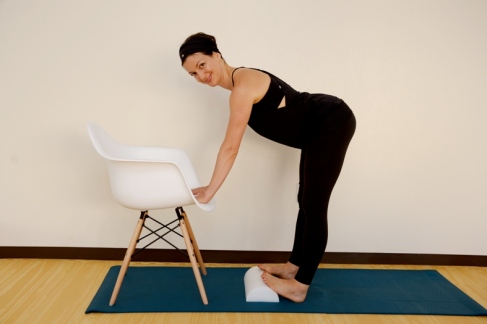
Use a mirror to make sure that you can do the above version of the stretch so well that your tailbone is parallel to the floor. If you can do that it’s time to add a level of excitement to the stretch. This time you will step on a rolled up towel or half dome and place the balls of your feet on top and the outside edges of your feet straight at hip width. This will ensure a deeper stretch. Again, keep the knees straight as you bend forward at the hips, keeping the low back neutral. Hold for a minute and repeat 2-3 times.

For an extra challenge: check with the tension in your quads by relaxing your knee caps.  You should be able to drop them loose during the stretch. Next, externally rotate your femurs so that the backs of your knees are pointing straight back. This may lift your arches and place more weight on the outside of the feet.  You are welcome!

Move well and see you soon!

Galya


Leave a comment

It’s all (or mostly) in your head

How do we learn about what’s normal? Or what’s natural? Mostly by observation. The more we see something, the more we start to accept it as common, and soon it becomes ”normal”. What was people’s ”normal” weight 100 years ago is very different from what we consider ”normal” today. Because something is common, that does not mean it’s healthy, good or natural.

Enter your head position! What is normal and what is natural?

Nowadays, normal looks more like this:

Teaching whole body alignment is a fantastic opportunity to show the difference between ”normal” and ”natural” and to bridge the gap between where you are now and where you have the potential to be.

Nowhere is this easier as when we observe the position of the head in daily activities. I am a perfect example of someone who has ”chicken head”. I am so curious about the world and want to participate so actively in what is going on in the world, that my head travels ahead of me. I enter a room and you see my head enter first, then my body…in the last few years I have been way more aware of that and nowadays you probably see my whole body enter a room – and I like to think that’s better 😉

In the illustration below my wonderful colleague Restorative Exercise (TM) Specialist, Debbie Beane  is demonstrating the optimal head to shoulder alignment.  On the left, you can see ear over shoulder, chin level with the ground, the weight of the head distributed evenly over the spine.  On the right you can see the more common – head forward posture, also known as ”my back is killing me” or ”I get headaches every day”.

Check yourself out? Where are you now? Can you make a gentle effort to take the head back a little bit?

sitting posture

Tuck your chin back, level it with the ground, elongate the neck. Now breathe and relax the shoulders.

A cool way to help the neck get long is to carefully pull the hair on the back of your head up and elongate the back of the neck. You can see me demonstrate that below:

P1420720

What did this small adjustment just save you? A migraine? Vision loss? Hearing loss? Cardiovascular disease? Back pain? 100 dollars worth of Advil?

You are welcome!